
|
|
#1
 04-03-2010, 09:11 PM
|
|||
|
|||
|
Today was a good day to crack open the box and setup my new SME 20/2 table and SME V arm.
 I decided to capture the setup journey for memories and to share with analog fans on AA. Cleared off my dining room table, made a cup of coffee, and cracked open the box. The table was well packed but nothing fancy, just some cardboard and foam dividers. No presentation quality stuff with this one.  Lifting the SME 20/2 table out of the box, I was both surprised and pleased that for a relatively compact footprint, the table is really heavy. Specs say 40lbs and it weighs every ounce of it. Nice, I like mass when it comes to tables. While I was in absolutely no rush to assemble it and I took my time admiring and learning about this new to me table that I have heard a few times before, setup is really not difficult at all. Part I. Table preparation. First step is removing the motor transit screw and the pads that protect it during the overseas journey. While on that step, I looked at the design and noticed the motor is free from the upper suspension deck and is decoupled from the bottom deck through rubber grommets. Motor has 3 spiked feet that drop into dimples in those grommets built into the lower deck. I don't expect any vibrations to make their way into the plint or the chassis. There is a rubber motor retaining band that holds it in place and levels the motor once the belt is on the pulley. Nice.  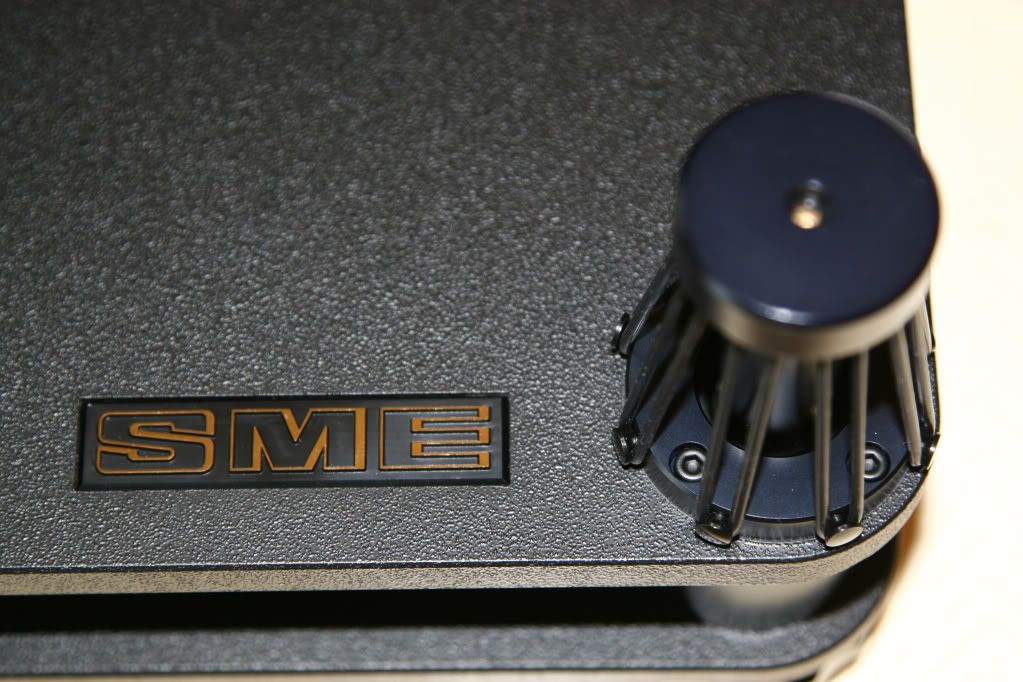 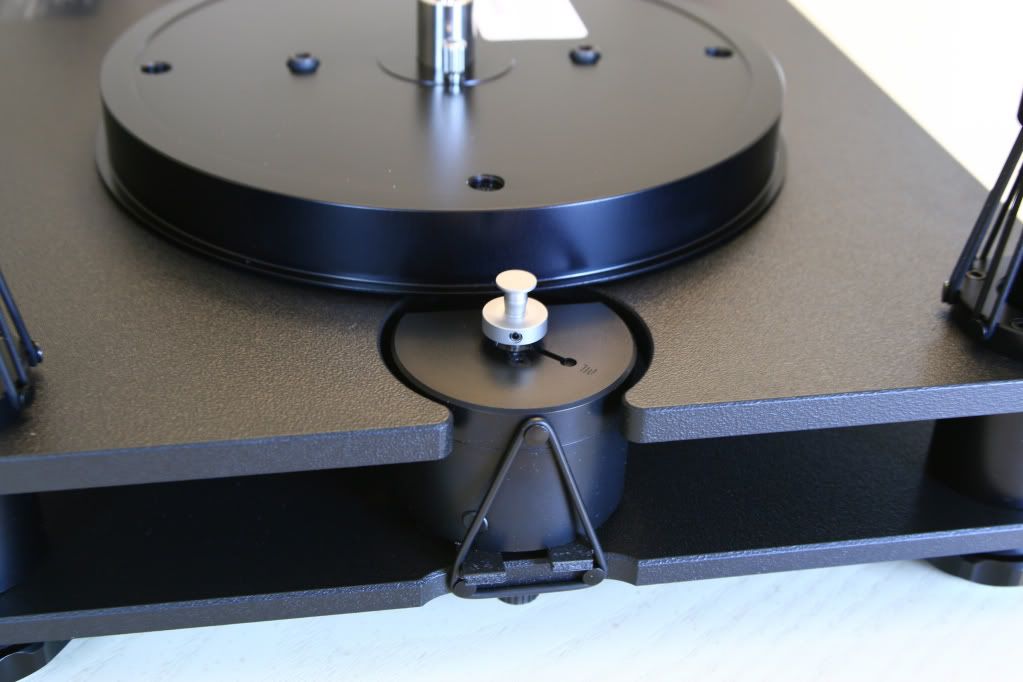 

|
|
#2
04-03-2010, 09:17 PM
|
|||
|
|||
|
Part II.
At this point oil has to be added to the bearing and is supplied in a syring with a metered charge. Using the already attached Oil Filler Adapter, I slowly emptied the contents of the syring into the bearing oil well without any difficulties. Once done, the Adapter is removed and stored back in the box. 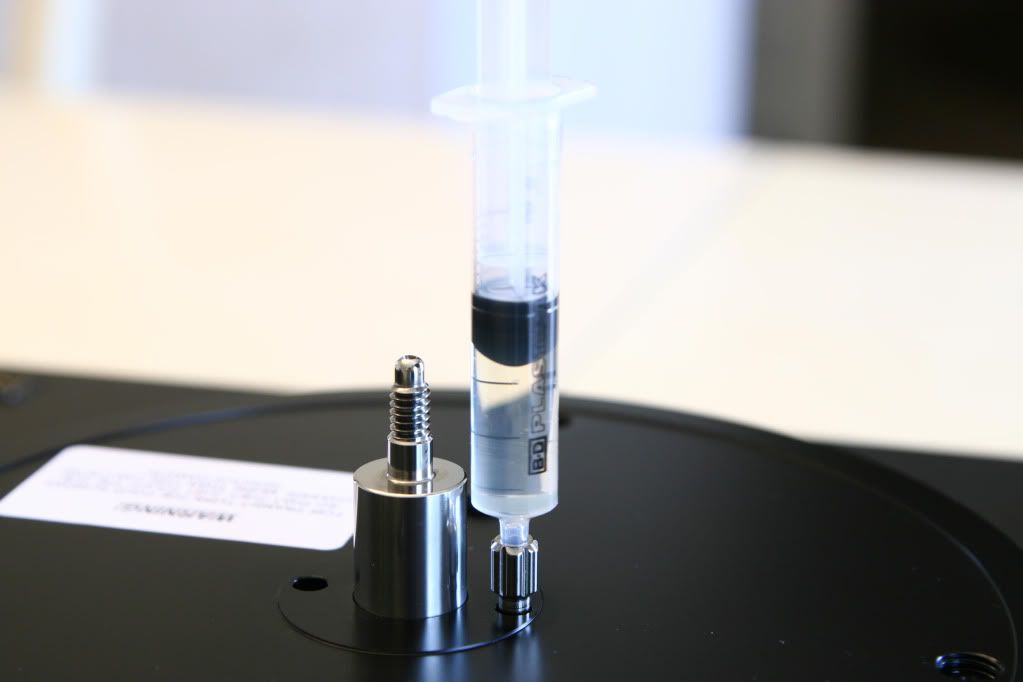 Next step is removing the two suspension screws that lock the suspension during transit. They are located and accessed through the top of the plinth. 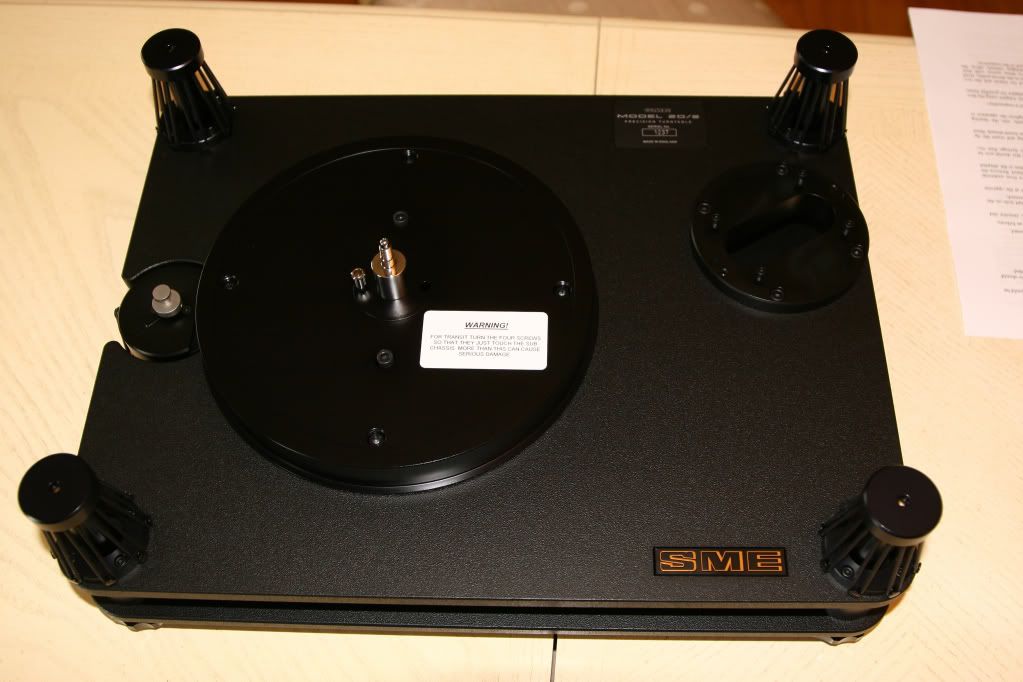 Next step is releasing the four screws that off-load the bearing during transit. They release in counter-clockwise rotation but are captive and stay in place. This releases the sub-platter to turn freely. They are also seen in the picture above. Next step is placing the platter over the spindle. 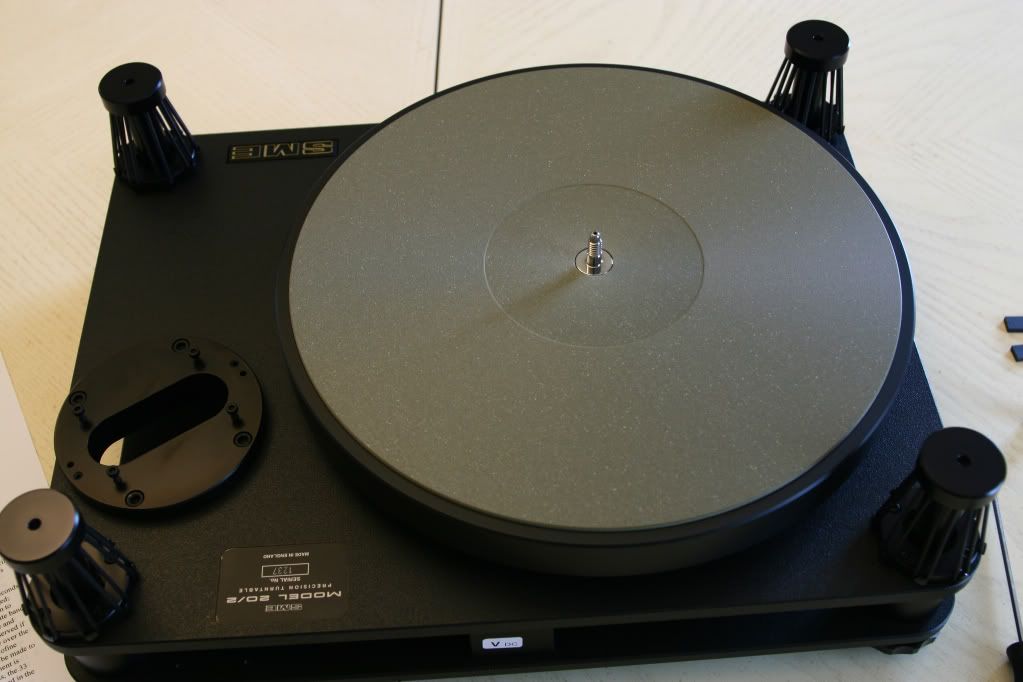
|
|
#4
04-03-2010, 09:24 PM
|
|||
|
|||
|
Part III.
The base is now leveled using the four knurled and adjustable feet. You have a choice of either going with the rubber bushings on the bottom of the feet or hard coupling with the metal balls in the feet. I chose the rubber since for right now the table is sitting on glass. The SME 20/2 does not have a built in bubble level like the SME30 so I simply used two bubble levels on top of the platter. It is important to rotate the platter all the way around and observe the bubbles as they do tend to shift through various degrees. A little bit of patience and tweaking the adjustable feet a little at a time results in perfectly level platter. 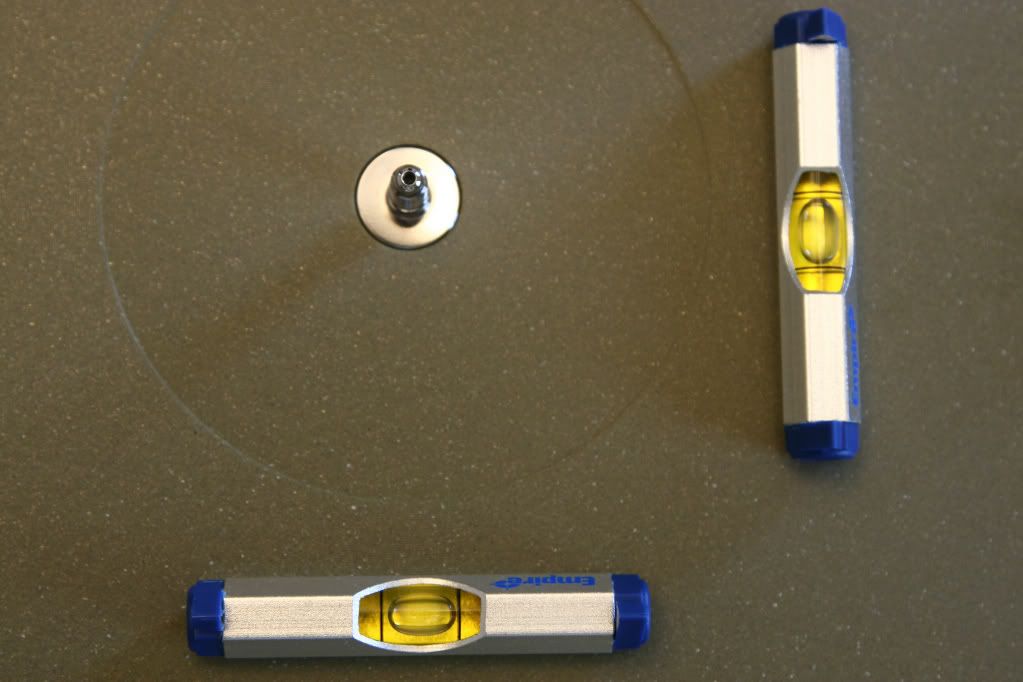
|
|
#5
04-03-2010, 09:37 PM
|
|||
|
|||
|
Part IV.
Tonearm mounting. I chose the flagship SME V for the project. Never heard it to be honest, I only spent time with the SME IV.Vi arm before. I figured at this point, if I was to spend just a bit more and get the V, I would never have to second guess my choice and wish I would have gone with the flagship arm from SME... It made sense to me and the decision didn't take too long. The 20/2 table already comes with the tonearm mount for the SME arm so it was simply a matter of dropping the arm in. Unpacking the V tonearm box, it was both very elegant and well packed with all the accessories, tools, various length screws and even a drill jig if it is to be installed on a different table. Removing the four tonearm mount screws and preparing the arm according to the instructions, I dropped the arm in, secured the rear screws and decided to pause, look over and take my time to understand this new to me tonearm as it is very different from the Clearaudio Satisfy Arm I got used to over the last year. Reading the whole instruction booklet before I proceeded, I began to understand the various features and mechanical design of the arm. Feeling confident in what I am about to do, I went ahead with the install. 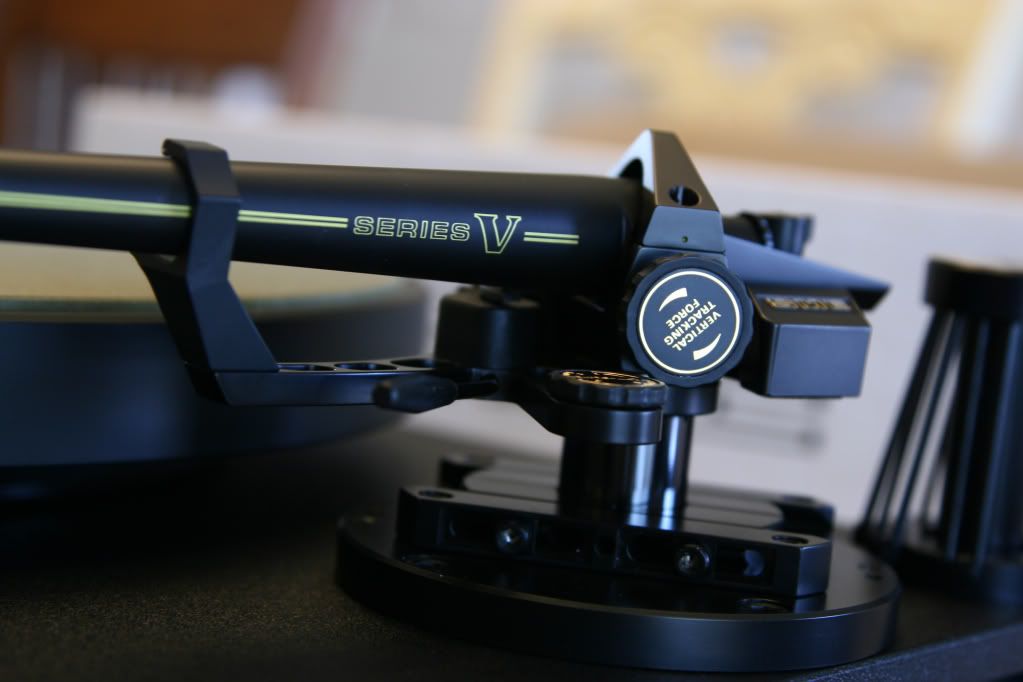  Before any adjustments took place, the cartridge needed to be mounted. A step one should always be extra careful with and move ahead with steady hands and lots of patience. Holding the cartridge steady in one hand, I hooked up the leads and mounted the cartridge into a non-adjustable headshell. 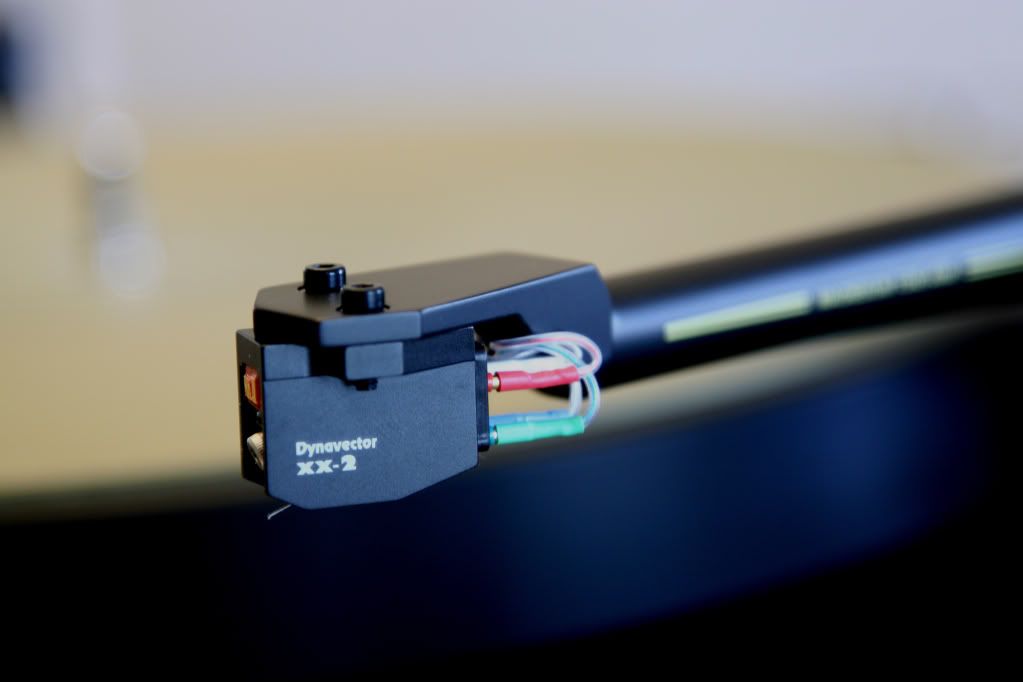
|
|
#6
04-03-2010, 09:50 PM
|
|||
|
|||
|
Part V.
Geometry. I won't bore you guys with the tedious geometry steps and make it brief. I decided to use the supplied protractor for the tonearm geometry/cartridge setup and then use my Dr.Feickert protractor to see if there is a discrepancy. Since the headshell is not adjustable, I was a bit skeptical looking at the supplied protractor of how things will turn out. SME uses an interesting approach of where you lower the stylus onto the supplied cross-hairs of the protractor and using a horizontal tracking angle key, you slide the tonearm rails back and forth until the drawn tonearm silhouette of the protractor matches the tonearm above it. I did it but was still skeptical. Once it was done, I double checked with Dr. Feickert using Loefgren geometry side and it turned out to be spot on.... Very cool. The SME protractor is very easy to use. Using the supplied protractor/gauge, I setup the vertical tracking angle leaving the VTA to be neutral with the tonearm parallel to the record at this point. VTF was dialed in with the vertical tracking force dial on the side of the tonearm and once again the skeptic in me was very surprised when I double checked with a high quality digital VTF gauge and it was spot on at 2.01gm at the indicated 2.0 gm on the dial. Matching the Anti-Skate dial to the VTF dial, I left it there until further test with HI-FI test LP to dial it in further. Have to say here, kudos to SME for providing all the very easy to use and very accurate protractor and I am impressed with the accuracy of the dials of the tonearm itself. Not that I would ever do any setup without the protractors and tools I have collected over the past year but I can see where if one did not have anyting but the SME supplied tools, it would be right in the ballpark.
|
|
#7
04-03-2010, 10:01 PM
|
|||
|
|||
|
Part VI.
Final tweaks. At this point, I removed the platter and brought the table over to my listening room. Once again, the table was checked for being level with bubble levels and a few minor adjustments were needed to the feet in its new place. Once the table was situated and leveled in its final resting place, the suspension needed to be adjusted. Using the supplied hex wrench and adjusting the screws in the suspension towers, one simply measures the gap of the suspension with the provided 3mm gauge. One can go a bit higher if acoustic feedback is to be suspected from being close to speakers or go a bit lower to dial in the sound a bit. Yes, it makes a difference as I discovered later on. Double checking the VTA, VTF and geometry and being satisfied, I hooked up the DIN tonearm cables to the base of the tonearm and my EAR324P phono stage. At this point I unpacked the motor speed control, plugged it in the base of the table, hooked up the ground strap and it was time to check speed accuracy. SME provides a strobe disc but I chose to use the excellent KAB strobe instead. Speeds were checked across 33, 45 and 78 and found to be steady.
|
|
#9
04-03-2010, 10:19 PM
|
||||
|
||||
|
Serge.......As usual, spectacular photographs, and play by play narration. Such a beautiful turntable, and top of the line tonearm. The Dynavector looks so sweet mounted on that arm. I have no doubt, once dialed in, this will be a premium rig that will provide you with state of the art vinyl playback.
__________________
Dan  STUDIO - McIntosh C1000C/P, MC2301 (2), MR88, Aurender N10, Esoteric K-01X, Shunyata Sigma spdif digital cable, Sonos Connect, PurePower 2000, Stillpoints, Furutech Flux 50, Michell Gyro SE, Michell HR Power Supply, SME 309, Ortofon Cadenza Black, Wireworld, Sonus faber Amati Anniversario LIVING ROOM - McIntosh C2300, MC75 (2), MR85, Magnum Dynalab 205, Simaudio MOON Neo 260D-T, Schiit Audio Yggdrasil, Aurender N100H, Shunyata Sigma USB cable, Micro Seiki DD40, Ortofon Cadenza Blue, Nakamichi BX-300, Sony 60ES DAT, PS Audio P10, Furutech Flux 50, Sonos Connect, Stillpoints, Wireworld, Kimber, PMC EB1i, JL Audio f113 VINTAGE - McIntosh MA230, Tandberg 3011A tuner, Olive 04HD, Sony DTC-59ES DAT, McIntosh 4300V, JBL 4312A
|
 |
|
|

| Audio Aficionado Sponsors | |
|
AudioAficionado Subscriber
 Inspire By Dennis Had
 Harmonic Resolution Systems
 Wyred4Sound
 Dragonfire Acoustics
 GIK Acoustics
 Esoteric
 AC Infinity
 JL Audio
 Add Powr
 |
Accuphase - Soulution
 Audio by E
 Canton
 Bryston
 WireWorld Cables
 Stillpoints
 Bricasti Design
 Furutech
 Shunyata Research
 Legend Audio & Video
 |


 Linear Mode

